Slide-In Camper/Aluminum Flatbed Hybrid
 |
2001
Cummins
2500 turbo-diesel 4x4 with 5-speed NV4500 manual transmission and limited slip differential. We've swapped out
the stock short-bed with a CM RD aluminum flatbed and
carry a
lightweight aluminum Four Wheel
camper - '20 Hawk shell slide-in model. We're currently
building out the rig for four-season travel to the type of inconvenient
places we tend to like to go.
| |
THE RIG WE ARE CURRENTLY BUILDING-OUT is an evolving process that takes time and experience to sort out and refine, so it's not complete, as we've just started the process of figuring it out. Though we are applying, wherever possible, what we've learned over the years, on, ANNA, our blue-water cruising boat, about good design fundamentals, which include robust and reliable electrical and mechanical systems and equipment, in general, that are proven and capable of holding up under stress. Also, the small things, details which make living in a small space, for more than a weekend excursion, reasonably comfortable. These things all add up, when you put yourself and your rig into more remote and sometimes harsh environments. Here's a quick glimpse into what we had in mind for putting this aluminum rig together, and what we've done so far, to simply cover the bare-bones basics - with a few details thrown in, here and there, for anyone that may share an interest in this sort of stuff.
 |
We built our side rails so they could drop down 90 degrees for use as utility tables.
|
 |
| Flatbed side rails provide plenty of useful outside storage and quick access for inspection, maintenance and fast connect/disconnect of camper tie-downs. | | | | |
|
 |
| Access
to outside storage on a flatbed/slide-in hybrid is primarily utilitarian. It's also
space efficient. And It frees up clutter inside the camper, too, from gear we would typically only use outside. Campsite set up
is simply more convenient and much faster as access to outdoor equipment is
easy to access, from the long, unobstructed lockers behind the flip-down
side rails. | | | | |
|
 |
Two
aluminum flip-down steps, one mounted on the aft CM flatbed skirt, the
other mounted in the receiver hitch provide easy access to camper
without taking up the extra cargo space that scissor steps or cumbersome
non retracting hitch steps require. The flip down steps also work well
in tight campsites where space around the camper may be restricted.
Additionally, these steps do not require a level ground surface for
stability. They take just a second to flip down at the campsite, or flip
up when getting under way, they have a zero footprint in the upright
position when stowed for travel. We thru-bolted they upper step to the
aluminum-plate skirt on the flatbed, and we mounted the lower step to
the receiver hitch. The lower step can be left in place permanently, or
removed easily and quickly if the receiver hitch is required for a
different application. Both steps lock into either the upright or down
position and remain securely in place.
|
 |
We designed these flip-down side rails on our flatbed to secure the outside storage
lockers when locked in the upright position, and to provide a utility table - one on the port side and one on the starboard side - when in the flipped down position. They can be left in place full time, or removed from the flatbed (by flipping the rails down and sliding forward off their hinges) if required. Amsteel rope is used to hold the utility tables/side rails in the flip-down, 90-degree load-bearing position.
|
 |
Our rig can negotiate many of the extensive primitive and remote National Forest Service logging, development, and fire service roads, which provide access to some remarkable dispersed camping and hiking opportunities. With the rig on a short bed the truck has a relatively short turning radius, that comes into its own when doing the occasional 180-degree turnaround, on a tight mountain road.
|
 |
The office.
|
 |
Campsite overlooking wintertime rapids on the White Chuck River, off Forest Developmental Road (FDR) 23, Cascade Mtn. Range, ten miles south of Darrington, WA, off the Mountain Loop Hwy.
|
 |
White Chuck provides very cold, fresh water and a lot of ambient white noise.
|
 |
Hiking FDR 23, at 1,200 ft elevation, 10 miles south of Darrington, WA - Cascade Mtns.
|
 |
A Wave 3 heater is a quiet and efficient radiant heat source when temperature dips into the 20 degrees F range. Two
Manchester #10 propane tanks are mounted outside, aft of the aluminum side rails, one on
each side of the flatbed. These are in
additional to two identical tanks that are stored in the propane locker. This can extend
the time before the propane tanks need to be refilled. In below freezing
conditions, the inside cabin temperature can be held at 68-72 degrees F
during the day and evening hours with the Wave 3 heater alone. Overnight we set the
thermostat on the furnace to the lowest setting, which holds the cabin at around 45-50 degrees F overnight, while sleeping. We shut off the Wave 3 overnight. During the day, while
we are in the cabin, we rely solely on the Wave 3 radiant heater and shut down
the furnace to conserve on electrical energy consumption - the Wave 3 does not use a fan to blow warm air, unlike the propane furnace, and therefore has no electrical load. This routine of using the two different types of heaters in alternation, will provide, minimally, 10 days in moderate
sub-freezing conditions, before the tanks need to be topped off. Running the Wave 3 heater on a low setting under the same outside conditions would drop the cabin temperature a few degrees and consume half as much propane, extending time between refills significantly. The heater settings on the Wave 3 (either low or high) or the specific thermostat setting for the propane furnace provide for various options by using either one of the heaters, or both of the heaters in parallel. It simply depends on our level of comfort inside, as the outside temperature rises and falls. If we leave the camper for a few hours we'll shut down the heater(s). It's quick to warm up the cabin when we return, with the furnace. After a few minutes, once the cabin is warmed up a bit we shut down the furnace and switch to the Wave 3, to keep an even, comfortable heat flow. We plan to install additional, easily removable and stowed window coverings, such as a double layer of Reflectix insulation with a small space in-between the layers to increase the R-value, which should prevent excessive heat loss or gain.
|
|
 |
We swapped out our Yeti cooler for an Engel MT45F 12v fridge; and yes, it is that energy efficient. On very hot summer days it will consume, on average, in a 24 hour day, about 3/4 amp per hour, while keeping refrigerated items cold. In winter we simply store our refrigerated foods in a closed container in one of our our outside storage lockers. This completely eliminates the electrical load of the fridge. We can still use the Engel in the winter to store other foods that don't require refrigeration. Our single 100AH Battleborn LiFePO4 battery will typically last us five full days before requiring a charge, and that is without any solar or battery-to-battery (B2B) charging contributions. Solar conditions during the winter, at 48 degrees North latitude, in heavily overcast skies, will generate limited power, but still enough energy from our two 160W (320W total) Overland panels to power our electrical loads indefinitely, if we use our outside storage area for keeping foods cold. Since the Wave 3 heater uses no electrical energy. and the Engel fridge is turned off in the winter, our electrical loads are minimal, coming primarily from cycling the 12v propane furnace overnight on its minimal thermostat setting, and recharging our USB devices and occasionally our LED lanterns. During the summer, or any season for that matter, in direct sunny weather, our two solar panels will produce more energy than we can consume. The system is balanced for year-round use under widely different solar conditions.
|
|
 |
Aft view of of cabin, after building a forward settee with large storage compartment underneath a piano-hinged lid. The open interior of the 'shell' model is spacious and it offers a higher degree of layout or build-out flexibility.
|
 |
We can insert an extension leaf, for the settee - which we stow secured against the port-side wall - that forms a double-sized, stealth, sleeping platform at the lower level. We may want to keep either a low profile, or have an extreme-cold weather option, where the roof remains lowered and locked down, eliminating heat loss through the, otherwise, extended, upper soft wall. This could also be an option if camped in active grizzly country, where a hard-sided camper has better protection against a mature, aggressive grizzly bear. An adult grizzly can stand over 10-feet tall on its hind legs and easily rip apart the upper soft wall of a pop-up camper at the loft level - where we would normally sleep. We've never had an incident in grizzly country that we've dispersed camped in, although we have seen aggressive grizzly warnings posted by the U.S. Forest Service who cover the remote back country on horseback. In Yellowstone, for instance, if you are trying to get a spot in one of their crowded campgrounds (not something we ever do for various reasons, but lots of people seem to gravitate to those type of spots) if a grizzly has been active and aggressive there, and destroying property, they will close the campgrounds to non hard-sided campers. It may be a long shot, but in our opinion one aggressive grizzly, on your six, is one too many, when dispersed camping near more off-the-beaten-track remote wilderness areas.
|
 |
In the upper sleeping bunk we placed a piece of Tyvek as a condensation protection layer between the platform and the Froli spring system, residing under the mattress, where a thermal boundary layer exists between the lower outside temperature and warmer inside temperature.
|
 |
Over the Tyvek we installed a Froli Traveller spring system to increase the comfort level of our 3.5-inch thick, high-resiliency, 2.8 lb/30 ILD medium firmness foam mattress, placed directly atop this spring system. A good, high-resilency foam, combined with a Froli Traveller spring system will eliminate the feeling of sleeping on a brick. In addition to the increased comfort that a spring system will provide, it also, and just as importantly, creates an air passage under the mattress that will negate any condensation or moisture build up on the platform and prevent the bottom of the mattress from contacting the platform and getting wet or moldy as a result. It's a very comfortable yet low-profile mattress system, which is required because when the camper roof is lowered, for travel, there is just not enough height left between the mattress (with bedding left in place) and the roof to latch the roof down securely, while underway. A thicker mattress system simply wouldn't work.
|
 |
Hiking along mountain-river trail No.731, just off our base camp in the Cascade range with snow level at 1,200 ft. The higher elevations can accumulate 20 inches or more of snow in a single winter storm at 2,500-5,000 ft elevation, more further up, while at river elevation we can get 1-5 of inches without getting snowed in. We can day hike higher up on the mountain trails to get into more snowy terrain before returning to the base camp before dusk. The seasonal weather patterns and condition of the roads tend to determine at what elevation we will set up our base camp. Many Forest Service roads and mountain passes have limited access or are impassable during the winter and spring as the snow at higher elevations accumulates. Areas at the lowest elevations, with heavy rainfall, can also flood and over-saturate the terrain causing landslides. Camping at elevations in the mountains along, or just above rivers, can be a good option in winter, to say nothing of the fact that these sites are often wide open and deserted in the off-season - not the case during the summertime.
|
 |
| Our 12v electrical wiring install for dual solar and battery-to-battery charging systems: we use Blue Seas thermal breakers both as thermal fuses and as on/off switches for the solar and B2B inputs and outputs, as well as a heavy-duty bus bar tied into the campers frame and running in series with the campers existing electrical wiring and bus bar. We also added an auxiliary fuse panel to handle additional electrical outlets and devices not already installed in the shell model's basic package. The shunt we installed is packaged with the Victron BMV 712 Bluetooth smart battery monitor. We use AWG 6 wiring to handle the electrical loads between the bus bar and the battery, on both the solar controller and the battery-to-battery charger. | | | |
|
|
 |
Blue Seas Circuit Breaker under the hood for DC-to-DC Charger.
|
 |
| Sterling
Power 1230 battery-to-battery 4-stage smart charger and Victron MPPT
100/30 solar controller are installed in the same compartment as the
Battleborn LiFePO4 100 AH battery (with heat pad for uninterrupted
charging in cold-weather climates), which is installed directly below
the electrical panel board. We can switch on and run the Sterling B2B
charger by flipping on its dedicated circuit breaker, if needed, night
or day, while driving or idling (but we tend to not idle our diesel
engine unnecessarily). The Sterling B2B charger is ideal for Lithium
battery charging profiles. It also puts very little stress on our 120
amp truck alternator, while generating a charging current of up to about
25 amps/hr to our 100AH Battleborn Lithium Iron Phosphate battery. The
Sterling can run in parallel with our solar charger. We run AWG 4 wire
from the truck's lead-acid starter battery under the hood, to the
camper's LiFePo4 battery. The connection from outside the camper to
inside the camper is through a quick disconnect Anderson plug mounted on
the flatbed's headache rack. We monitor the system's electrical loads
primarily using the VictronConnect app on an Android phone. In addition,
we mounted the redundant Victron BMV 712 smart battery meter on the
outside face of the tower, which contains the battery box, located
behind the solar MPPT controller; the Sterling B2B charger is mounted on
the inside of the cabinet door, and remains cool enough in that
compartment, with its own built-in exhaust fan and large vents to keep
it running without overheating and shutting down due to thermal
overload. The auxiliary 12v electrical panel is easy to access and
located underneath the hinged top lid, in the drawer at the top of the
tower. The heavy-gauge wiring passes through a cutout hole in the
tower's draw bottom, directly to the Lithium battery, solar controller
and B2B charger. A side note about our primary reason for choosing the
combination of a Sterling Power B2B charger and a Victron 100/30 MPPT
solar controller vs. an all-in-one Redarc, or other, B2B charger combo:
the Sterling Power charger, when combined with a Victron 100/30 MPPT
solar controller will allow for a total solar voltage rating of up to
100Voc. The Redarc, on the other hand, will shut off solar charging when
the solar voltage is above 28Voc. If you want to take advantage of
solar and B2B charging simultaneously and, if you have a solar array
that has a maximum voltage of over 28Voc, then it is an important
consideration to make sure that your solar controller is capable of
working with higher-voltage solar panels, such as the Overland 160w
panels, which we use, that have a maximum of 32.76Voc. Unfortunately,
the Redarc will shut off solar charging if you exceed somewhere between
28-32Voc, according to their manual - not hard to accomplish on a sunny
day. You could also exceed 28Voc on the Redarc (or any other controller,
for that matter, which limits voltage too much) especially if you
decide to wire your solar array in a series configuration, where
voltage is additive. This could essentially defeat one of the most
significant advantages of wiring a solar array in series - less current
draw with smaller-gauge wiring over long wire runs. Just saying, check
the specs on your individual components when considering system
compatibility. |
|
|
|
| | | | | | | | | | | | | | | | |
|
|
|
 |
Two Overland Solar 160w ultra-thin and lightweight panels (320 watts total) on roof, mounted to an aluminum z-bar frame that we built and installed onto the Yakima roof tracks feed a Battleborn 12v 100AH Lithium (LifePO 4) battery. Extraordinarily efficient. With a Victron 100/30 MPPT solar controller the output current in our setup has on occasion measured close to 16 amps/hour in direct sun with the panels lying flat (no tilt) on the rooftop; typically near summer solstice when the sun is directly overhead. Each 160W panel is nominally rated at 6.27 Imp (A) and 32.76 Voc. The camper's stock AWG 10 wire, which runs through the roof to the interior of the camper, probably should have been equipped with AWG 8 to be able to accommodate more than one rooftop solar panel. Nevertheless, AWG 10 is still minimally okay for safely carrying a 10-12 amp current for about 20 feet with acceptable efficiency losses through the wires (for instance, two Overland 160W panels, each rated at 6.27 Imp (A). In the case of our Overland panels, which have a higher 32.76 Voc, where voltage losses through the wires aren't as critical as solar panels with lower Voc specs, we felt that having two panels on the roof was a non issue. We wanted to run our two Overland 160 solar panels in a parallel wiring configuration. The 10 AWG wire run from the roof to the solar circuit breaker ran 20 feet, but on the run from the solar circuit breaker to the MPPT controller, and then from the MPPT controller to the Lithium battery, we installed larger-gauge wire. Since the MPPT controller will boost current from the controller's output to the battery - by converting excess voltage to increased current output - we used AWG 6 wire on that segment of the run, to safely handle the increased current output and its associated heat buildup. AWG 6 wire will minimize efficiency losses. We run our array in a parallel configuration to minimize the overall effect of any significant shading, on just one of the panels, which would essentially eliminate output from both panels if it were wired in series. If one panel is obscured or out of commission when both panels are wired in parallel, the other panel(s) will still work, which isn't the case in series wiring configurations. Overland Solar panels have very good efficiency in bright overcast, modest efficiency in partial shading, and low, but still some efficiency, in heavily overcast, rainy, low-light conditions. In direct sunlight or very bright skies, and combined with an MPPT controller, the panels are off the charts in output efficiency.
|
The Fantastic Fan Model #1250, is a relatively inexpensive, simple, reliable 14x14 inch 12v roof fan/vent for a camper. It's also a black hole of energy consumption; but it can be significantly improved simply by modifying one of its electronic components: the 3-speed motor switch. The stock on/off switch has three speeds: high, very high and scary, jet-engine high. And while it does move a lot of air, it moves it extraordinarily inefficiently. The fan is extremely loud on its highest settings and consumes too much energy, even on its lowest setting and as such, we hesitate to use the fan not only because it's not quiet, but also consumes a lot of amp hours from our 12v Lithium battery.
All these issues can be completely resolved by bypassing the on/off switch's 3-speed function and replacing it with an astoundingly inexpensive solid-state, variable speed, PWM (pulse-width modulation) motor control board. The original switch controls speeds with coiled resistors, which essentially reduce the speed by bleeding off electrical energy as dissipated heat. While this does reduce fan speed, it does not reduce energy consumption as the fan motor is always running in a 100% duty cycle, regardless of speed.
 |
The original coiled resistors in the 3-way switch are bypassed and replaced with a PWM controller.
|
By modifying the fan with the addition of a PWM motor controller, the duty cycle can be modulated from 0-100%. This will result in a highly energy-efficient fan, which will run at an infinitely adjustable fan speed. The PWM cycles electrical energy on and off, in pulses, at all fan speeds. So, for instance, instead of outputting energy at a 100% duty cycle all the time, even at the very lowest fan speed, it's output (waveform) is modulated to only use as much energy as required to move the fan at whatever speed you select. This results in the ability to set your fan speed to any level of output you want, with the ability to run much quieter at the lower speeds, while consuming way less current. For example, the lowest speed setting on the stock fan will consume 1.8 amps per hour over the course of the day and up to 3 amps per hour on the high setting.
 |
The RioRand upgraded 6v-90v 15a DC motor variable-speed controller mod.
|
After modifying the fan with a PWM controller the current used at the lowest practical settings will effectively be reduced to less than 0.2 amps per hour, which will provide a very gentle air movement. At about 0.1 amps per hour, the fan blades will slow to a crawl and stop spinning completely when the dial is turned down completely.This represents up to a 10x increase in energy efficiency at practical lower and medium fan-speed settings, which translates toward the length of time you can operate your equipment between battery charges. This is especially important when you are off the grid and relying on solar power for your battery charging.
 |
The variable-speed control knob in the upper right-hand corner is the only noticeable difference on the face of the fan's display panel; a small yet powerful modification.
|
My diagram, below, shows the correct paths for wiring in the RioRand upgraded 6v-90v 15a DC motor speed controller to the Fantastic Fan Model #1250 'on/off switch' and the 'reverse switch' (air intake/air exhaust). The PWM control board can be purchased online for under $8. The only physical differences on the fan's display panel will be a new variable speed knob to replace the 3-speed function of the on/off switch. You will now only use the original switch's '0' position for the power-off function, and the '1' position for the power-on function. The original fan speeds: 1, 2 and 3 are now replaced by the PWM variable-speed control knob.
Note: The original wiring can be disconnected and left in place.This will give you the option to revert back to original wiring and operation of the 3-speed switch in the unlikely event of a PWM board failure. There are only two wires that this affects, and they can easily be connected with their existing slide-on connectors. See bottom of diagram where it shows the 'original' paths. This is an easy mod, just disconnect the old black and white wiring where indicated, add your own new wiring (14 AWG red and yellow marine-grade wire) and follow my color-coded wire paths to and from the indicated terminals on the 'on/off switch', the 'reverse switch', and the new 'PWM controller'.
 |
Wiring diagram for modifying the Fantastic Fan model #1250 with a new PWM control board.
|
There are other 12v fan/vent manufacturers and model options that we considered. All have advantages and disadvantages. The venerable, manual 12v Fantastic Fan Model #1250 also comes in increasingly more sophisticated models, some with built-in thermostats, rain sensors, and remote controls,that open and close the vent automatically, but those are more things waiting to fail at the most inconvenient times; they are also much more expensive with little added benefit for a simple camper.
The ever popular new MaxxAir 12v fan/vent (6000 and 7000 series) has a built-in rain guard, which is a very nice feature, but it does have a larger footprint on the rooftop, which may interfere with shading your solar panels if you have limited space up there. But even if that were not an issue, the stock electronics within the MaxxAir fan aren't stellar, they're certainly not ideal for a 12v camper that charges its batteries at over 13.6v - and which battery charging routines don't put out at least 14V when charging an AGM or Lithium battery, especially on a camper equipped with solar, or a DC to DC charger? The solution for a MaxxAir is to add (to your brand newout-of-the-box fan) an adjustable step-up/step-down voltage regulator, which is capable of setting and holding the output voltage from your batteries, to the fan, at 12.9vdc, - this will prevent early burnout of the fan motor due to over-voltage, when charging your batteries and running the fan at the same time; applying a conformal coating to the PCB is also advised. And in addition to adding a variable voltage regulator, you should probably also seal off the hole where the wiring passes through from the fan's motor to the control board below - to eliminate condensation dripping down the wires and onto the fan's electronic control boiard, which could potentially short out the circuit. These are commonly known technical problems that are in the marketing brouchures that will eventually cause the MaxxAir fan motor or control board to fail prematurely, over time. So, if you use a MaxxAir fan then you should probably make the necessary mods and think of it as as preventative maintenance. The MaxxAir also has different models with greater or lesser degrees of electronics and expense.
In the end, we choose to make a simple energy-efficiency modification to the otherwise reliable (out-of-the-box), manual, Fantastic Fan Model #1250. It was, in the end, the simplest effective solution, and the least expensive, for optimizing/upgrading the basic, stock model 12v Fantastic roof fan/vent.
 |
We installed four Torklift Derringer Fast Gun tie-downs to secure the rig to the flatbed. The tie-downs are conveniently accessed from the outside storage lockers, which are protected from the elements by the aluminum flip-down side rails. The tie-down eyes are galvanized and hot-forged, and the loads are distributed with heavy-gauge aluminum backing plates under the ribbed, aluminum decking. The Derringers are beefy and don't vibrate loose on washboard roads. The Derringer handle, which opens and locks down the connection between the camper and the flatbed deck is secured in the closed position by a stainless pin and ring. It takes a second or two to release the pin and flip the handle up or down to remove or reattach each tie-down. We screened-in the four floor hatch doors so we could have insect-free air flow into the cabin as required. When we run the Wave 3 heater we open one of the floor hatches an inch and crack a roof vent or upper an upper window an inch for proper circular ventilation. Since the tie-downs are accessed from the outside we were able to screen-in the four lower floor hatches. We made the screens using aluminum mesh installed on the outside. The hatch doors are unobstructed inside the cabin.
|
 |
The silent and efficient Wave 3 propane heater can be mounted on a 1/8 inch aluminum plate that can be attached to a steel swing arm. We use our Wave 3 in conjunction with, but independent of, the 12v propane furnace, depending on the severity of outside conditions. Each heater has its own propane tank for redundancy and eliminates excessive tee fittings.
|
 |
| Part of our toolkit consists of a Warn VR EVO 12 synthetic rope winch,
mounted below the pushbar on the front bumper. We try hard to avoid
getting into situations that would require self recovery, but still, you
could get unlucky on a dodgy road. |
 |
Another good tool for self recovery, while offroad, in addition to the winch, is a set of traction boards, which may be useful in slick snow or mud, slippery rocks, or deep sand. We carry a set of Maxtrax on the roof rack over the cab of the truck for convenient, out of the way access. If we couldn't get traction with our limited slip differential, in 4WD low, then the Maxtrax and a good D-handle shovel would be our next step. Airing down the tires is yet another option, and to make that possible we carry a set of Coyote automatic tire deflators as well as a portable 12v Viair 400P air compressor to air the tires back up, once again, before heading out on dry pavement. Generally, we stay away from rock crawling Jeep tracks with our rig. But we do see plenty of mud and loose gravel and uneven dirt roads. The worst roads we tend to travel are corrugated washboard roads. This is one place where we would air down to take the edge off the ride, both for comfort and the sake of our suspension, which includes Billstein shocks and Firestone Ride-Rite airbags for rear-end stability and automatic leveling. Generally, we have good traction on most light to moderate US Forest Service dirt roads and tend to run, while offroad, with our Nitto Ridge Grappler 285/75R16 A/T E-rated 10-ply tires fully inflated, with few exceptions.
|
 |
The traction boards are mounted on the forward section of our roof rack and secured with four upright stainless bolts, one near each corner of the Maxtrax. The traction boards are fastened down with quick release stainless wing nuts (the bolts and wing nuts are hidden by snow in this shot). We run a short length of Grade 70 chain link through one of the Maxtrax handles and run it around the forward, steel roof-rack crossbar and lock it down with a padlock.
|
 |
| One
advantage of the flatbed is that the camper sits just a tad higher on a
flatbed than on a traditional pickup body.And as a result the camper's
overhang sits a few inches higher over the truck's cab. This creates an
opportunity to utilize the roof of the truck for carrying a few low
profile pieces of equipment behind the Maxtrax. In this photo: two folding camp
chairs and a Quick-Set Clam portable shelter. We modified our Yakima Q towers and
round crossbars by running four lengths of steel Superstrut
(half-height, slotted) between the two crossbars and secured them to the
crossbars with stainless u-bolts. Superstrut is a strong, heavy duty, 1
5/8 inch wide C-channel, that comes finished in a gold, electroplated
finish, which is highly corrosion resistant and provide a good substrate
for paint. It's perfect for building out a roof rack to your own specs.
The slots running down the top of the c-channel are convenient for
thru-bolting stainless pad eyes and other hardware for strong tie down
points. Superstrut channels are typically used for hanging and mounting
commercial and industrial HVAC equipment. |
 |
View of Mt. Pugh, Cascade Range, WA, from our campsite at dusk with a raging winter river.
|
 |
Overnight snowfall at campsite, FDR 23, Cascades.
|
 |
| Dumping a heavy, wet snow load off the roof after a surprise overnight snowfall. |
|
***
Offline communications and mapping hardware/software that we use in the field:
- inReach Mini 2-way sat/nav communicator
- Pixel 4a cell phone w/enhanced GPS
- CalTopo offline mapping app
- onX Hunt offline mapping app
- Dark Sky (Hyperlocal Weather) app; NOAA weather
When out of cell phone/Wi-Fi range, which occurs frequently and most often in remote, off-grid locations where we tend to travel, we use offline mapping tools, whenever hiking or driving (on-road or off-road). The best mapping software we have found provides for downloadable offline area maps, with layers for topo. satellite, and hybrid views in either 2D, 3D, or both, and cover backcountry hiking trails, or offroad motor vechicle trails and two-tracks.
CalTopo is used for seach-rescue ops and we use it as well for planning routes and hikes within remote areas, as well as for detailed info on the best approach to those remote Forest Service Roads, BLM and other public lands. We download the available high-resolution offline maps for specific areas that we have identified as places we might want to explore in further depth. That way, if we lose cell phone coverage we will still have detailed maps preloaded for offline use - it doesn't help much to have a GPS fix and no visual reference on a map to where you actually are, so offline maping is an important tool.
We also use the
onX Hunt mapping app, which provides a rotatable 2D and 3D view (similar to Google Earth) along with numerous data layers detailing public land
and private land boundary lines, with details about those specific boundaries (owner/acreage/widlife management/wildfires/MVUM (Motor Vechicle Use Map) road networks/trails/altitude/dispersed camsite locations, etc.
We use our
Pixel 4a cell phone to display our offline mapping and weather apps. The Pixel has a very responsive, integrated GPS and will rapidly lock onto and maintain a solid fix, even under a heavy tree canopy or within canyons. The Pixel also has an excellent camera and very high-resolution display. When within cell or WiFi range the Pixel is our basic means of communications and data downloads, from sources such as Dark Sky (which the inReach Mini uses for weather forecasts, and
NOAA weather - NOAA, by the way, has recently upgraded their weather computer-model algorithms; they have greater localized resolution now, resulting in more accurate, sophisticated, and reliable short- and long-term forecasts.
Once we are out of cell phone/Wi-Fi range we rely on our Garmin
inReach Mini
Sat/Nav 2-way communicator. It is very lightweight (2 oz) and
fits within the palm of your hand. As long as there is a clear view of
the open sky it will lock onto the
Iridium satellite network and allow
2-way messaging through SMS text or email. It also has an emergency SOS
button that connects directly to a SAR dispatch network - International Emergency Response Coordination Center (IERCC) - .for emergency
services, worldwide.
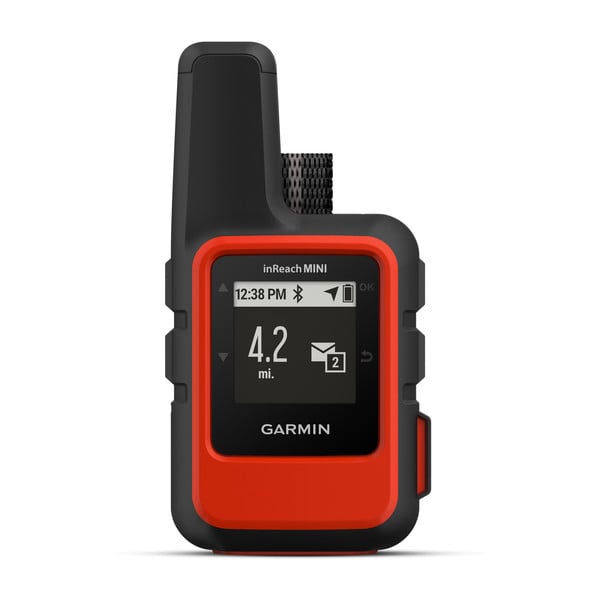 |
InReach Mini Iridium Satellite 2-way communicator
|
The inReach Mini is by far the most useful and inexpensive sat/nav equipment we have seen or used, to date. We have been using mapping software and offgrid communications hardware for about 25 years now. We started off on our ocean-going sailboat with an HF radio (and a HAM license) and connected the HF radio to a Pactor III modem, linked to a Thinkpad PC and added additional enhancing software for e-mail and weather downloads (raw GRIB files) on the open ocean. We then added a stand-alone Iridium Sat phone to the mix and tied that into our PC software as well, for sat-nav comms. We also used an ACR one-way PLB (Personal Locator Beacon) in the event of an emergency at sea.
But technology has evolved and what used to be necessary for standard and emergency communications can now be held in the palm of your hand, with greater capabilities and significantly less expense, in terms of both up front and monthly or yearly subscription rates for required services.
The inReach Mini, for instance, has a low-cost subscription rate of $11.95/per month and a price point, for the inReach Mini itself, currently at about $300 (check Amazon or REI for their latest fluctuating prices - typically between $299-350). When we compare that to what an Iridium sat phone will cost you: $1,000+ in addition to an Iridium yearly service plan, another $1,000+, or a standalone ACR emergency SOS beacon (another $1,000) or the cost of a HF-radio, Pactor modem/PC set up, with antenna and associated installation expenses we begin to approach $5,000. So, you can begin to see that, for a basic, portable, standalone 2-way sat/nav communicator and emergency SOS device, the economy, utility and flexibility of the inReach Mini is incredicbly hard to beat.
If you are going offroad or offshore, in remote areas without cell phone coverage, we would strongly recommend the inReach Mini, either as a standalone emergency device with a dedicated SOS button, or preferably in combination with your smartphone, using Garmin's
Earthmate app - which will give you the option of allowing you to wirelessly connect your smartphone to the inReach Mini via a paired Bluetooth connection. Once connected you can use your smartphone to view your maps, and to easily type, send and receive SMS messages and email, as well as receive
Dark Sky weather forecasts, track your trip in real time and transmit your waypoints and/or messages to a dedicated web page that will show your latest GPS position and track, and any messages you chose to send. Anyone that you have granted permission to, to access your personal Garmin inReach web page, can track your progress and view your status reports and send you a text if you've granted those permissions. You can do all that with just the inReach Mini by itself, but with bluetooth pairing, your smartphone is seemlessly connected to your inReach Mini and much easier to use for sending messages, and of course, for viewing the mapping software you have preloaded onto your smartphone. This is a very slick combination.
***
Our 37-foot cutter, Anna, has criss-crossed the North Pacific and South Pacific Oceans on numerous long-distance crossings from Alaska to New Zealand and everywhere in-between, over the years. Many of the electrical, energy and mechanical systems that we installed for our ocean crossings made sense to us when we were planning and fitting-out our land rig.
We wanted an older, proven, tough and reliable diesel truck to carry a relatively light-weight aluminum camper shell that we could customize to our own needs. And we wanted it sitting on a strong, economical aluminum flatbed, with a reasonably small footprint. We wanted the ability to go pretty much anywhere within reason, too. But primarily to access remote, public National Forest Service roads and the like, to get to more isolated, dispersed-camping and hiking opportunities. We chose to keep our rig pretty basic, utilitarian. It has a long range on its stock 35-gallon fuel tank and the turbo-diesel has proven surprisingly fuel efficient and economical under a load and in the mountains (20 mpg). And it's comfortable enough for two people. It does exactly what it's designed to do - it gets us from point A to point B, often enough, in non optimal conditions and without a lot of fuss.
We have been shaking down the rig over the last couple of years as it has slowly evolved, with a few extensive outings within the U.S. National Forests and BLM lands (Bureau of Land Management) during the summer months, throughout the states of Washington, Idaho, Montana, North and South Dakota, Wyoming, Utah, Colorado, New Mexico, and Oregon, each lasting about two months and covering thousands of miles, in addition to some shorter winter outings in the Washington's Cascade Mountain Range. So far,and frankly, to our surprise, it has been encouraging, if not atypical for us, that the basic systems modifications that we have put in place have worked out as well as we had hoped they would; sometimes better than we had anticipated. We also know that there is no, one, correct way to go about something. Some solutions may be more elegant than others, but in the end, there will almost certainly be a tradeoff involved. What works well on one rig may not be possible on another. That's simply the nature of the beast.
***
 |
When we sailed, Anna, to South America about ten years ago we decided to take a little time to do some exploring over land, as we rarely got off the boat to travel. So when we went to Patagonia, during their winter season we decided to rent a 4WD pickup with a slide-in camper. It wasn't really set up properly for tooling around in the frigid air, ice and snow during the wintertime, at 55 degrees South latitude. But we didn't mind, as we learned a few things about what it was lacking and thought about how it could be better. And I think it planted a seed for us to someday, when we were finished sailing, build out a land rig that would work in the kind of places we liked to go.
|

And while we were out in our marginal 4WD slide-in camper rental, exploring some remote areas in wind-blown, frozen Tierra del Fuego, we happened upon this beast, a Mercedes Unimog overlander. It was huge and built like a tank and it was lined with silver insulation. It had a solar array on the roof, and a big diesel with massive fuel tanks, as well as a string of flood lights above and below the heavy-duty front bumper and roof rack, and enormous knobby tires, and it looked like an armored Brinks truck making a delivery in Antarctica - which in reality, was just a stone throw away, by open-ocean standards, across a narrow strip of the Southern Ocean. If it had track-plates instead of giant tires it probably could have cut a path across the frozen tundra. And we thought, well, how could we reduce the foot print of this behemoth, and bring its astronomical cost down to earth, and still have a reasonably comfortable and capable rig that could handle, say, the Rocky Mountains and Forest Service roads and dirt two tracks and modest off-road stuff, from Alaska to South America, in conditions that weren't quite so extreme as, say, the high latitudes in the dead of winter, or continuous days and nights of extended camping in sub-zero weather. The Unimog is cool, very cool in fact, and oddly luxurious when contemplating spending a lot of time in extremely hostile environments, but really, it was overkill for our intentions and way beyond economical. And that's how we came to think about and design our current rig.
 |
Torres del Paine National Park, in southern Chile, is officially closed during the winter but you can enter for free and camp for free and have the whole place to yourself, as long as you understand that it's all at your own risk. If you have a vehicle that is equipped to handle the extensive network of unmaintained roads during the winter, which can become snowbound and icy and obstructed by rock slides after a storm, it could simply be a remarkable experience - at least we thought it was, even in a rented, ill-equipped, 4WD slide-in truck camper with sketchy heating. Winter is very long and very cold there, but compensated by mostly sunny, calm days between fierce storm systems. Okay, maybe a Unimog wouldn't be overkill there, at that time of year.
 | | Overland travel in southern Patagonia in the height of winter isn't for everyone, it's desolate and certainly frigid and on occasion extremely windy (75-100 knots). It is also wild and stunning and in our opinion, worth the effort. But it also helps to have a nice warm cabin to hang out in, and to get a decent night's sleep in, particularly after a day of frozen hiking or even driving around in difficult conditions - we think that this may be especially true, if your cozy cabin happened to be sitting upon the back of your own flatbed rig, way out there in the elements of nature. |
|
|
***
--
Rich and Cat Ian-Frese


